Areca is a traditional brand of RAID controllers in various form factors, especially stand-alone controllers for external RAID units and also PCI/PCI-e cards for use inside personal computers.
The Areca RAID firmware traditionally has an inherent TCP/IP stack
with HTTP management and SNMP service. (That in addition to a text-mode
terminal interface, available via serial console or a BIOS app.)
Speaking of a TCP/IP stack implies, that the Areca controllers
principally have an own Ethernet interface on board - only the lower end
PCI/PCI-e cards miss that Ethernet port: e.g. the ARC-1110/1210,
the ARC-1200 and the ARC-1203-2i. Those RAID controllers without
an onboard Ethernet port must communicate with the outside world
by mediation of the host operating system, running on the host PC,
where the Areca is "just a storage controller".
And this is where things get "interesting". While the HTTP and SNMP services on the own Ethernet port have always been a piece of cake and have always "just worked", the indirect communication via the host OS is more complicated. Sometimes called "PCI in-band communication" in the Areca docs, the HTTP sessions are relayed by an "Areca HTTP proxy" service running in the host OS, and the SNMP agent is handled in a slightly different fashion yet: through a native SNMP service of the host OS, which loads an Areca-specific "sub-agent". The subagent is like a specific plug-in of the SNMP super-service.
This approach is characteristic for the SNMP world = an OS having a principal SNMP agent service which is modular, extensible by auxiliary sub-agents. The UDP socket at port 161 is handled by the OS-own SNMP service, the sub-agents talk to it via an internal "subagent API" (and may use an SNMP toolkit/library provided by the OS-own SNMP support).
The SNMP sub-agent needs to talk to the Areca RAID controller(s)
in the system, which happens by IOCTLs through the Areca driver
in the host OS kernel. Thus, in order for the Areca SNMP sub-agent
to load successfully, you first need an Areca storage driver
in the host OS.
In Windows, you probably need to install the driver
by hand, downloaded from the Areca website = pass the driver
to the Windows installer in the first place, if you boot Windows
from an Araca RAID volume.
In Linux, you probably have a driver in your distro
- it's been present in the vanilla kernel source tree for ages,
and kept fairly up to date to support modern Areca hardware.
And, if the point is to make SNMP work via the host-based subagent, the card's firmware needs a small nudge to cooperate = needs a small bit of configuration. To achieve that, the system admin needs management access = needs the ArcHTTP proxy in the system as well / in the first place.
Thus, this guide effectively covers the installation of all the companion software provided by Areca :-) Of which the SNMP bit can be the toughest.
While writing this howto, the following firmware and software versions by Areca were working fine:
ARC-1203-2i firmware: 1.56 2020/11/23 (latest at the time of this writing)
ARC-1212 firmware: 1.51 2012/07/04 (latest)
ARC-1110 firmware: 1.49 2010/12/02 (latest)
Windows driver: 6.20.00.36 2020/10/21 in Windows 10 (LTSC 1809 build 17763.1697) - driver downloaded from Areca
ArcHTTP Windows: 2.5.2 2018/12/20
ArcSnmpAgent Windows: 1.0 2018/01/31
Linux driver: 1.40.00.10 as a standard part of Linux 5.2.7 vanilla kernel
ArcHTTP Linux: 2.5.1 2018/05/29
arecamib Linux: 4.1 2011/01/13
The composition of Areca software (driver + ArcHTTP + ArcSnmpAgent) has been constant for ages, since maybe Windows NT. The Windows environment sure has been evolving around it. There's been a transition of the driver from SCSIport to StorPort and maybe WDM to WDF, and the way you go about enabling the SNMP service has recently changed a bit, cosmetically, in Windows 10.
The driver download and install is pretty generic, no need to go into details. It's a storage driver, so you need to make an "F6 floppy" if you want to boot Windows from an Areca RAID volume. As of this writing, all the management (including SNMP) appears to work with Windows 10 compatible driver releases 6.20.0.33 and 6.20.0.36 .
Maybe don't install Areca SNMP just yet, you'd better get the Windows SNMP
super-service going first. Just follow the flow of this guide please.
For now, next up is the ArcHTTP Proxy.
The ArcHTTP Proxy is again a pretty simple download and installation, next - next - finish. No need to run the setup.exe explicitly with admin privileges or any special treatment in that vein.
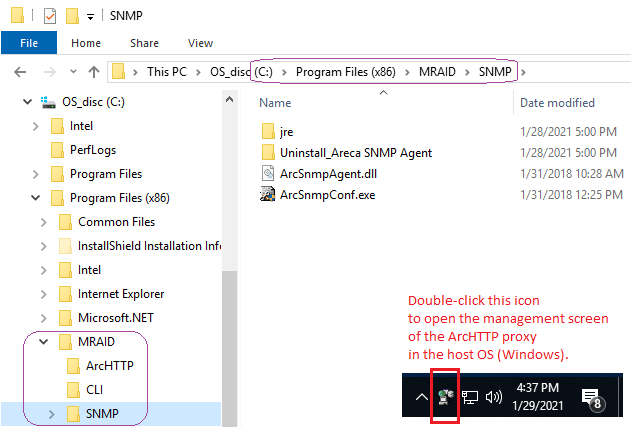
The Areca user-space software lives together in Program Files:
In the bottom right corner of the screenshot just above,
I have photoshopped (mspainted, actually) a piece of the systray.
By double-clicking that icon, the Areca tray applet
launches a web browser with the local ArcHTTP proxy configuration.
See the following two screenshots.
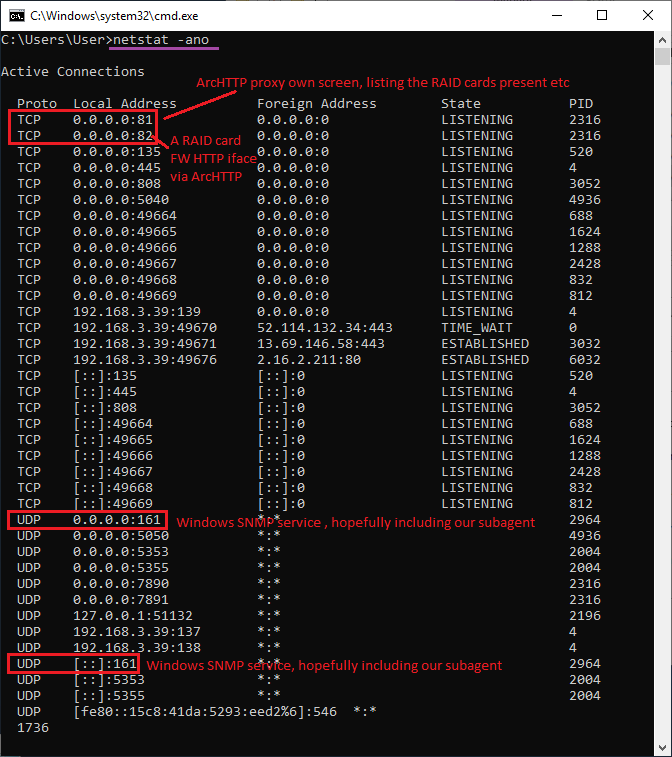
Note that the ArcHTTP proxy listens on TCP port 81 by default (subject to configuration).
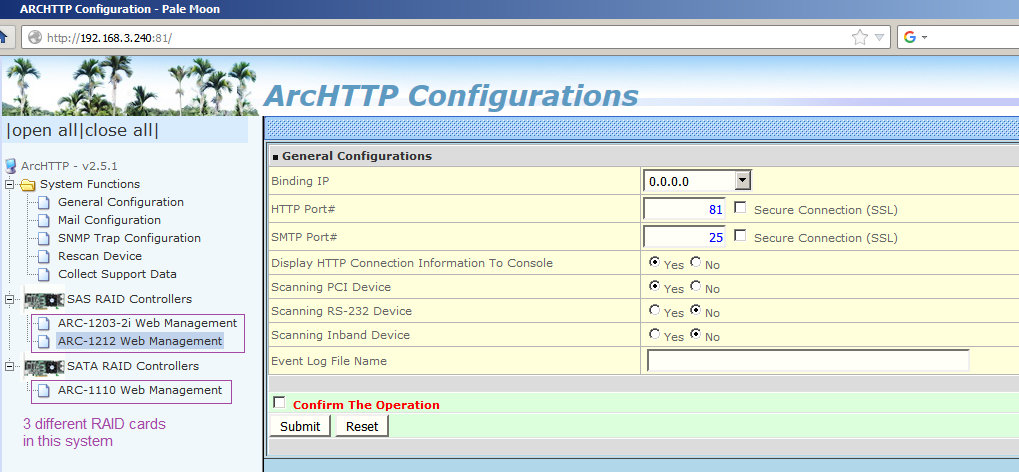
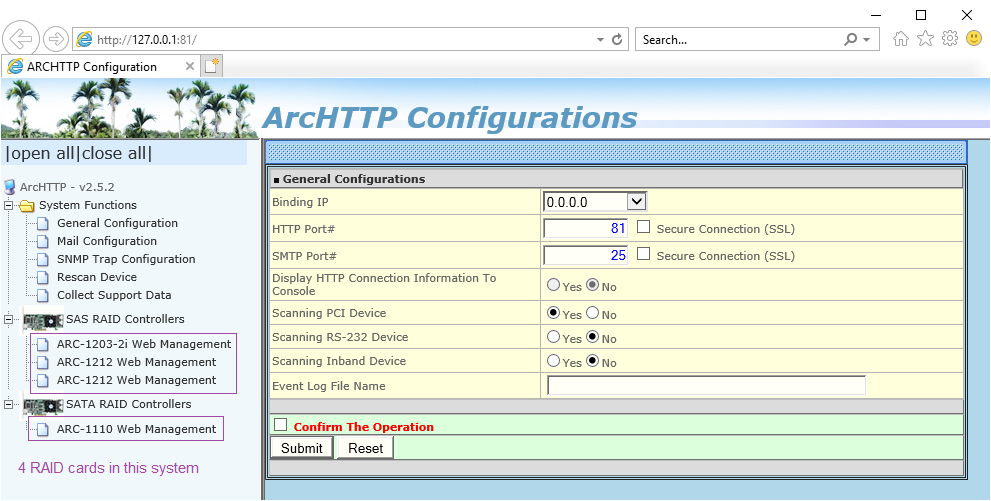
Those two screenshots just above were taken on two different machines, with different Windows versions and browsers. Note that one screenshot shows local management on the same host (the one with a 127.0.0.1 localhost in the address row) while in the other screenshot, the browser is connected to a different machine on the LAN. In fact the physical box with the RAID cards is the same in both cases, just managed from a local desktop vs. remotely, and the system had a different set of RAID cards physically inserted in each case.
So far, we've been watching the ArcHTTP's own main menu and configuration.
This is not specific to a particular RAID card, this is "machine global" stuff.
Now if you click any RAID card in the list on the left,
the hyperlink brings you to the management of the particular
RAID card itself. Don't get fooled by the identical looks
- a new window has opened and you're talking to a whole different entity!
Because we're running via ArcHTTP (rather than a dedicated Ethernet port), the per-card HTTP interfaces listen on ports other than 80 (and other than 81, which is where ArcHTTP itself places its own main/config screen) = the individual cards in the system get TCP ports 82, 83, 84 etc.
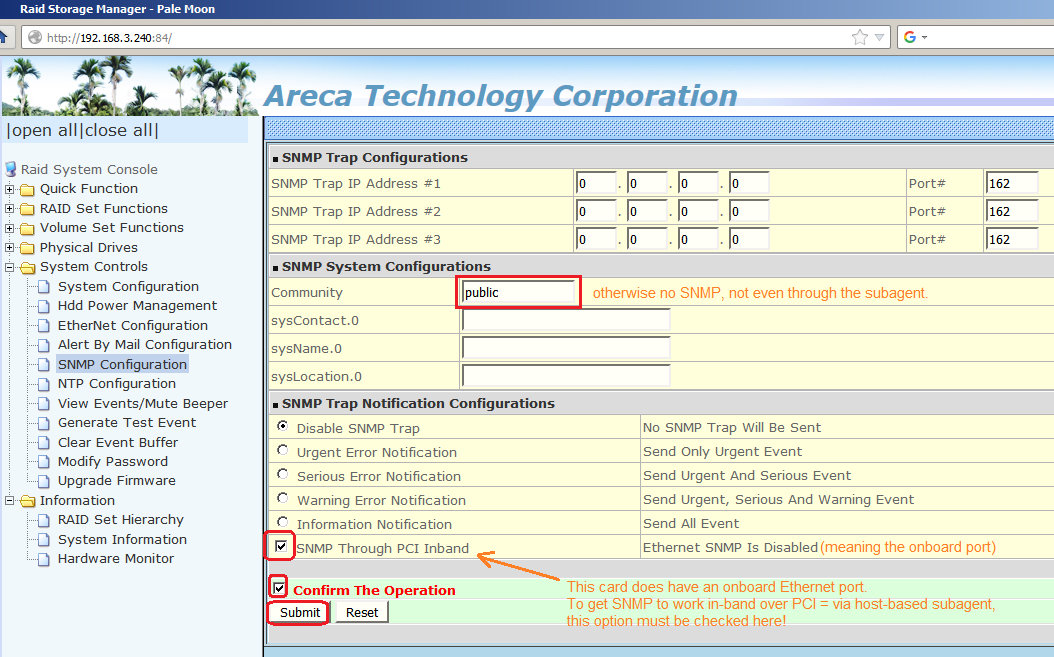
And, the following is crucial, for SNMP to function:
You need to configure the SNMP community string
in the RAID adapter's own firmware,
and on cards that have an Ethernet port,
you also need to switch the firmware's SNMP support to work
in-band via PCI, rather than on that dedicated Ethernet port.
If you don't get this right, it stops the show for your
host-based SNMP sub-agent, as far as that particular RAID card is concerned.
Now that we have the first important pre-requisite over with, it's time to tackle (tickle?) the Microsoft Windows SNMP service.
Not sure about NT/2k anymore, but in modern Windows, the SNMP service
is an optional part of the operating system. It doesn't cost an extra fee,
but it does not get installed by default.
Before the tile-based Modern UI, i.e. definitely in Windows 7 and earlier,
this has been available via the "Programs and Functions" control panel
(earlier called "Add/Remove Programs", aka appwiz.cpl),
through the sideways menu called "Turn Windows features on or off"
- and it has always been a piece of cake to get installed.
Pretty obvious really.
Now in Windows 10, the SNMP service as an installable option
has moved to the new, "modern UI"-styled "Apps and Features" panel,
and deserves a few extra screenshots and... words of reassurance :-)
First of all, how to access the "Apps and Features" panel:
the easiest way is to search for it. Open the search box in one
of the numerous possible ways, and type "features".
As soon as Windows suggest "Apps and Features" among the
matching search results, you can stop typing and just click that result.

You should get into the following "metro" panel:
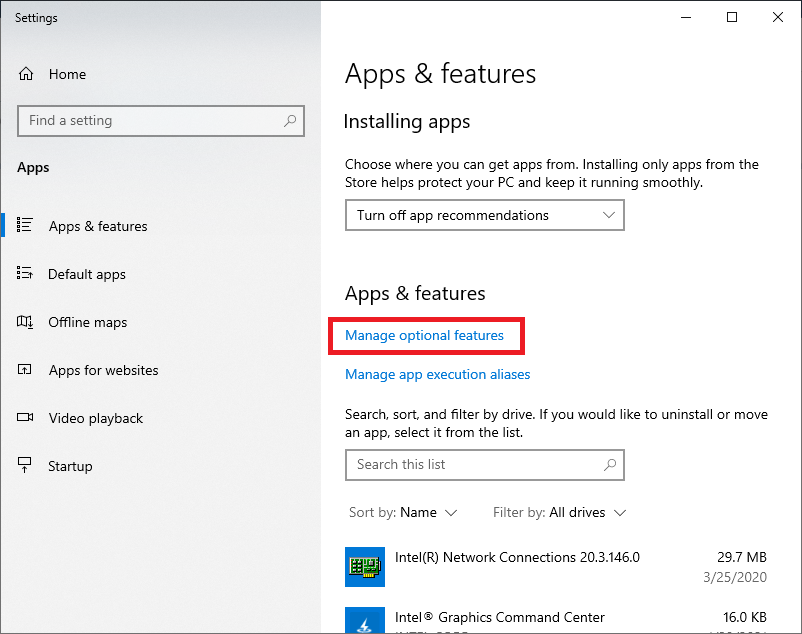
Here you need to click "Manage optional features", which opens another dedicated panel:
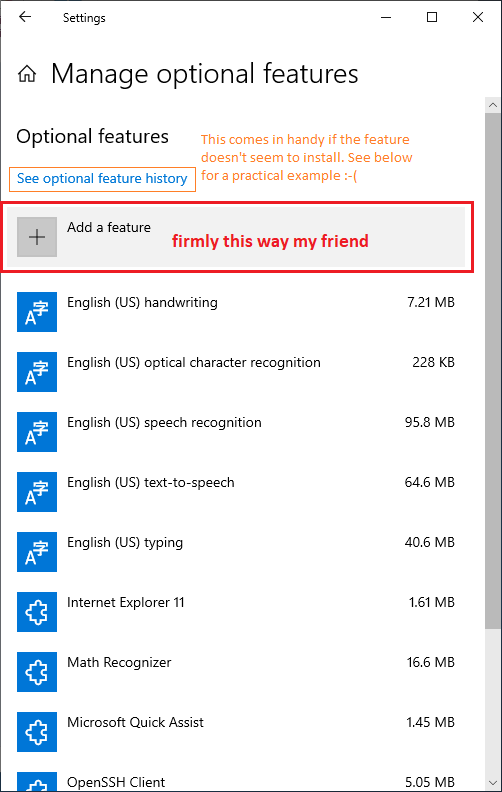
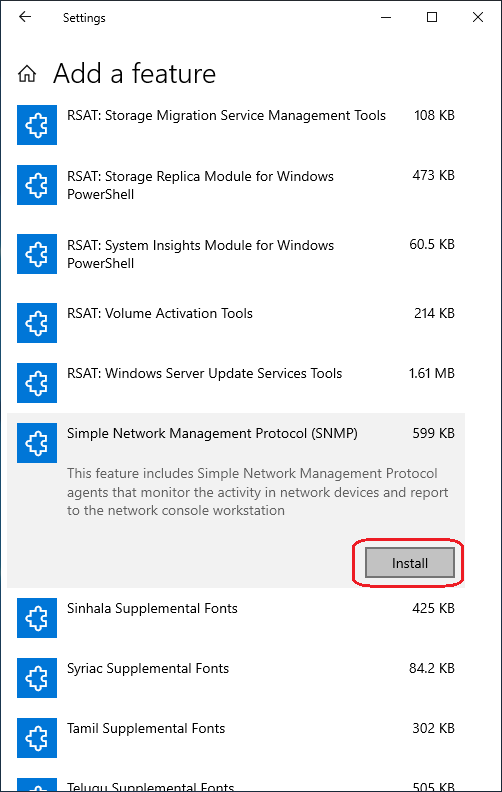
If you have come to install the SNMP service, you "likely" won't find SNMP among the Windows options already installed. Yours is the tile labeled "Add a feature".
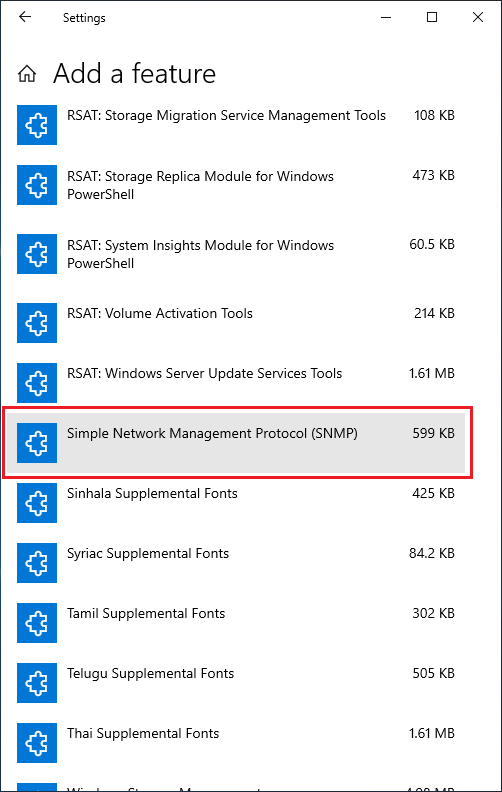
And here finally, you should get offered an option labeled "Simple Network Management Protocol (SNMP)".
So if you click that promising tile, it reacts by showing an "install" button. Click install, and we're done.
That was easy, wasn't it? "And, what does the victory actually look like?", I hear you ask. "Do I get a 'finish' button to click?"
Umm. There are actually two possible outcomes: success, and failure.
Success apparently looks like this:
In the last window depicted above, called "Add a feature",
shortly after you click "install", the tile for SNMP
just vanishes from the list.
"Okay", you'll probably be wondering, "what do I do next?
Are we finished yet?"
Turns out the only thing you can do, is leave that
"Add a feature" window. Preferably not by closing the
whole applet, but by "going back" one step,
web browser style, using the arrow at the top left.
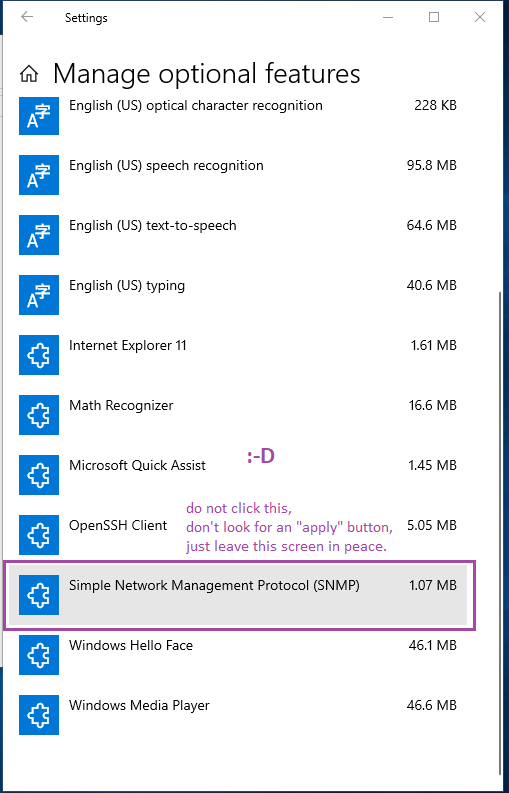
Thus, you will return to the window saying "manage
optional features", where you're faced with a tile
labeled SNMP, highlighted grey, containing a thin
grey horizontal ribbon that looks like a progress bar,
except that it does not seem to move in any way.
If you click that grey SNMP tile,
it produces a button saying "cancel".
[I will add a screenshot as soon as I have a chance to take one.]
You certainly do not want to click "cancel" at this stage, right?
So you just take another step back, i.e. back to "apps and features",
hoping that this is really it. And you can already close "apps and features" too.
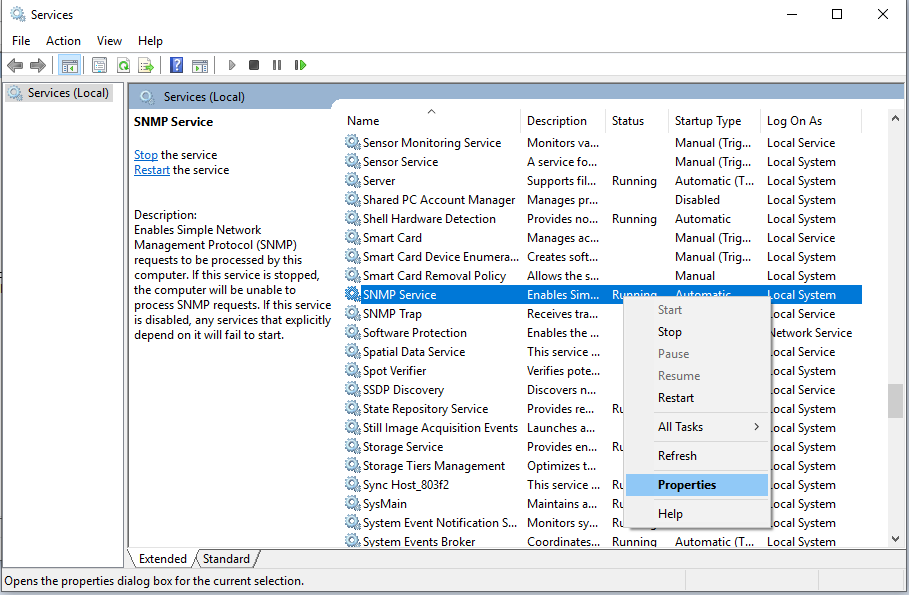
The ultimate proof that the SNMP Service is installed, is its presence in the traditional services applet (services.msc).
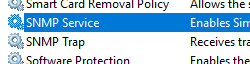
If you kept services.msc open during the installation of the
SNMP service, you may need to press F5 to refresh the list
of services (the SNMP service should appear).
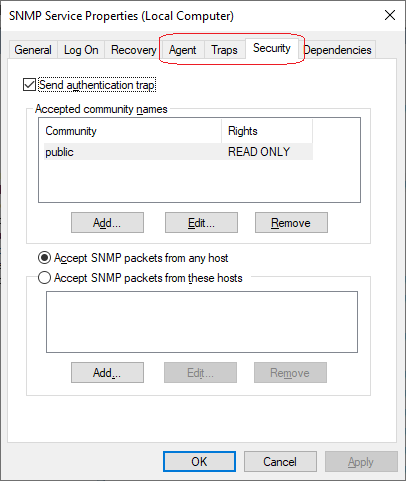
And, although the service is already there, you will probably
find out that its "properties" dialog is missing two tabs,
called Traps and Security. These will only appear after a reboot.

And this is what you want to achieve:
Now... the installation of the SNMP feature (in the "Add a feature" dialog) may also fail :-(
How do you know that this has happend?
After you click "install" in "Add a feature", and you go back
to "Manage optional features", you notice that the
Simple Network Management Protocol tile has only showed up
for a few seconds, and has vanished - often before you can
manage e.g. to click it (trying to bring up that "cancel" button).
So you try "Add a feature" again, and sure enough,
SNMP has reappeared there, in the list for you to select
the feature to install.
So you try "install" again, and it returns back to the list
in "Add a feature" in a few seconds.
To verify that there's indeed a problem, you can take a look at the history (log) of "Manage optional features", as mentioned above:

...which can look like this:
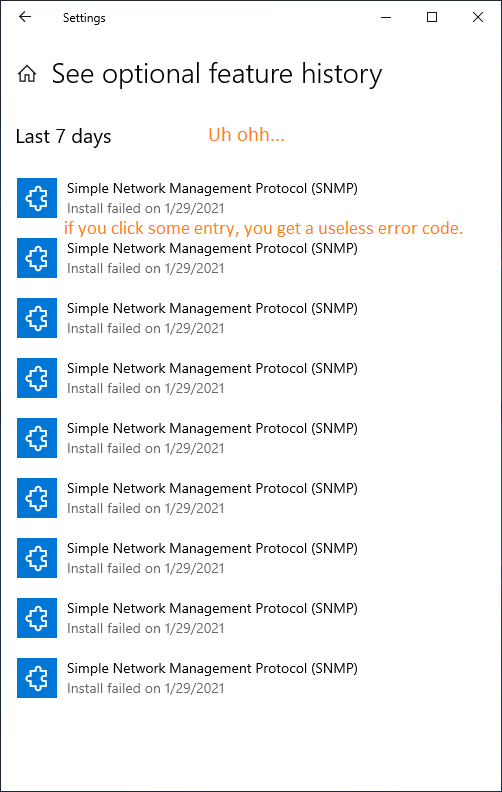
Apparently, this is a symptom of some digestive disorder inside
the Windows subsystem managing system features and has something
to do with the Windows Update as well. It might be specific
to a particular Windows 10 build under specific circumstances...
Whatever the cause, there is a workaround that appears to do the job:
that forces the installation of the SNMP feature.
From an article at MS Technet,
I've taken the crucial inspiration to write my own PowerShell script.
You need to run the script or the powershell interpreter from a CMD shell
that has elevated (administrator) privileges, and you may face
yet another security hurdle - read the script's leading comments
to learn the necessary details and find your way through.
The script basically prepares a needed key in the Windows Registry
to temporarily modify the behavior of Windows Update,
forces the installation of the SNMP feature using the DISM tool
(in the form of a PowerShell cmdlet), and cleans up a bit afterwards
= returns the Registry keys to their default state.
The successful outcome of this episode should look like this:
And of course you should see the SNMP service listed in services.msc .
Interestingly, if you have just installed the SNMP option "the hard way", you may notice that the SNMP service properties already contain the desired 3 extra tabs, and you can configure them.

Even more interestigly, still talking about "the hard way" aftermath, note that after the very next reboot, those SNMP service tabs will lose their config, and you need to configure them again, this time for good. So effectively, regardless of "the easy way" vs. "the hard way" of enabling the SNMP feature, you have to reboot the computer, before you can finish the config of the Microsoft SNMP service...
Follow the screenshots to configure the Windows SNMP service,
in order for it to properly host the Areca SNMP subagent.
Start in services.msc by right-clicking the SNMP Service
to conjure up a context menu. Once in the menu, click Properties.
In the next screenshot, follow the numbered items.
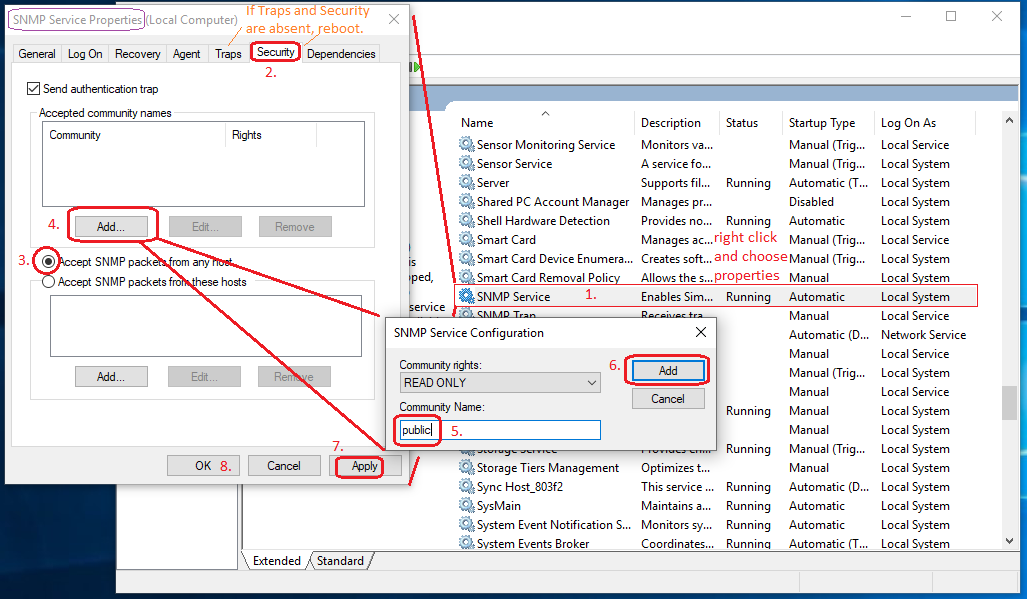
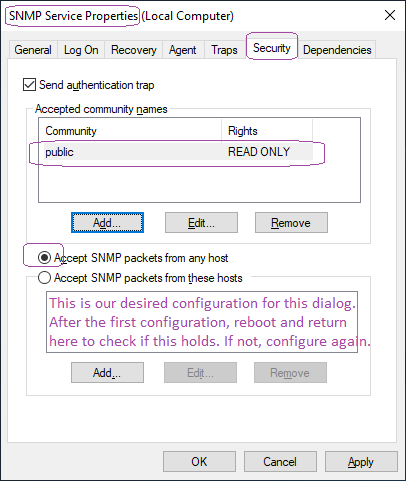
As a result, you should get the "public" community listed under "accepted community names" in the Security tab of the SNMP Service properties.
While you are here, consider also setting the community in the neighboring tab called "Traps" - only needed for traps, possibly just those that are Microsoft's own = the MS SNMP Trap config has no effect on Areca SNMP polling access and possibly no effect on Areca SNMP Traps.
When you feel that you're finished, remember to reboot the machine again for a good measure.
Next, install the Areca SNMP package (subagent) for Windows.
Once the Areca installer is finished, you may want to restart
the SNMP service (if not the whole PC again).
To quickly check if the local machine appears to be listening to the various TCP / UDP ports as expected, use netstat -ano
Next, try accessing the services with a web browser and with your SNMP client of choice.
Tested in Debian 9 64bit with vanilla kernel 5.2.7, containing the arcmsr driver in version 1.40.00.10 (this is the version from vanilla upstream Linux).
Dependencies and initial downloads, approximately:
apt-get install snmpd libsnmp-dev libtool-bin
apt-get install gcc g++

cd /usr/src
mkdir areca
cd areca
wget https://www.areca.us/support/s_linux/snmp/linuxsnmp_V4.1_110113.zip
wget https://www.areca.us/support/s_linux/http/Linuxhttp_V2.5.1_180529.zip
wget http://support.fccps.cz/industry/areca_snmp_howto/areca-linuxsnmp-patch.zip
unzip *.zip
The Linuxhttp ZIP file contains just a finished binary of archttp.
This is just a proxy that passes incoming HTTP sessions for Areca
management to the firmware's internal HTTP service.
Feel free to copy that to someplace like /usr/bin/ ,
and just run that. It won't daemonize and it should report
any Areca cards detected in the system, along with the TCP ports allocated
(one port for the archttp itself, further TCP ports for individual cards).
The more systematically inclined admins among us might prefer
a systemd service unit called archttp
- this example wraps around archttp64.
The comments in the file contain useful instructions on how to set this up.
Update: archttp64 v3.0.0 seems to support SNMP as well! Perhaps the ordeal in the rest of this chapter is no longer necessary?
The linuxsnmp ZIP file contains a few source files in C++ and a binary library that needs to get combined with the source code to produce a binary called arecamib, which is an SNMP subagent for Linux, subagent to the snmpd from net-snmp.org (in Debian, this is a standard package of the distro). My patch mentioned above changes a line or two referring to SNMP header files for inclusion.
cd linuxsnmp_V4.1_110113
patch -p0 < ../areca-linuxsnmp.patch

Read the following two files:
HowToBuildSubAgent.txt
HowToRunSubAgent.txt
Contrary to what the Areca docs say, you do not need to download the source
tree of net-snmp.org. Instead, you can just download the binary Debian
packages, plus their -dev appendices (effectively header files
for the binary net-snmp.org libraries contained).
And, build arecamib inside its own source directory.
Before you "make subagent64" , you should check the Makefile,
that this Make target uses a shell script coming with snmpd, called
net-snmp-config --compile-subagent
gcc to link the subagent binary, called arecamib .
Which is a problem, because the binary blob library
coming from Areca apparently is a C++ thing, and requires
a C++ flavoured stdlib. Probably the easiest way to
go about this is: replace both two occurences of gcc
in /usr/bin/net-snmp-config with g++ :-)
Also, I suggest that you manually copy
linux/x86-64/libarclib64.so
from the Areca linuxsnmp source directory to
/usr/local/lib/ , where it can be
found both by the build-time linker and
by the resulting arecamib binary at runtime.
So after this, you should be ready for
make subagent64
as the original Areca docs suggest.
Feel free to copy the resulting arecamib to someplace
convenient in Linux, such as /usr/bin/ .
Unlike Windows, where the subagent is a DLL,
here the arecamib subagent is a stand-alone binary daemon,
talking to snmpd through a UNIX socket (a named pipe
in the filesystem). The libsnmp has a curious arrangement
that allows subagent code to use a single common API,
whether it is compiled for monolithic inclusion in snmpd,
or to exist as a stand-alone subagent (talking via a pipe).
Another point needs an affectionate touch:
the /etc/snmp/snmpd.conf
(the link points to an example of my complete config file).
This is what the Areca docs say needs to be included
at the end of snmpd.conf:
master          agentx
agentXTimeout 60
agentXRetries 10
/var/agentx/master .
And, it turns out that for the Areca MIB to be authorized to work,
a few more lines are necessary.
The easiest (although maybe not the finest) way to go about this is:
##  Locate and comment the following line:
#com2sec paranoid  default         public

##  Uncomment or add the following:
rocommunity public
com2sec readonly default public
com2sec readwrite default private
Distraction #1:
We've mentioned this before, so this paragraph is a little redundant...
Repetitio est mater studiorum.
What the following screenshot shows is the config of the "ArcHTTP proxy"
= not the config of an Areca firmware instance.
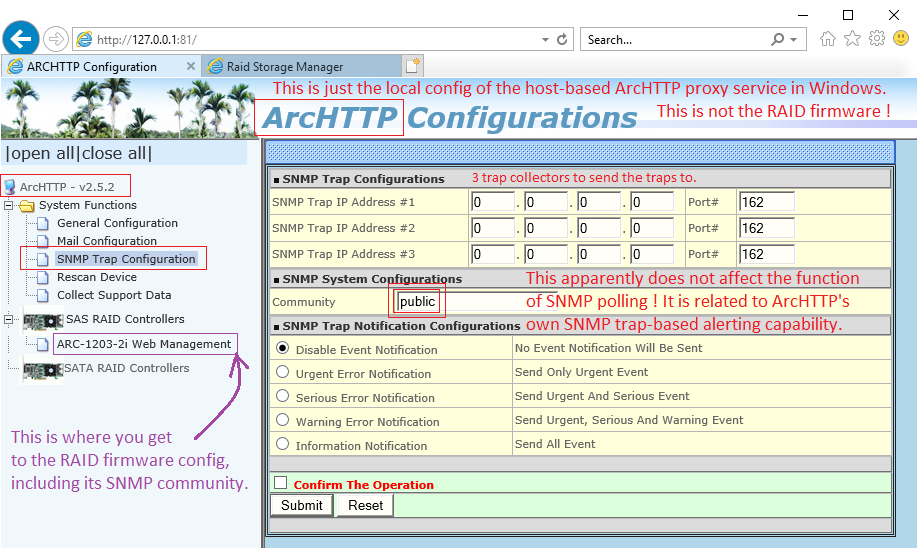
Read: if the community string is absent here, it won't prevent the ArcSNMP polling access from functioning. Therefore, if your ArcSNMP polling access is defunct, you need to look elsewhere = check the firmware config, rather than this distractively similar config page.
Distraction #2:
The ArcSNMP subagent comes with a companion exe utility,
installed in the same directory - and the sole purpose of this EXE
is some simple config. The following is a screenshot.
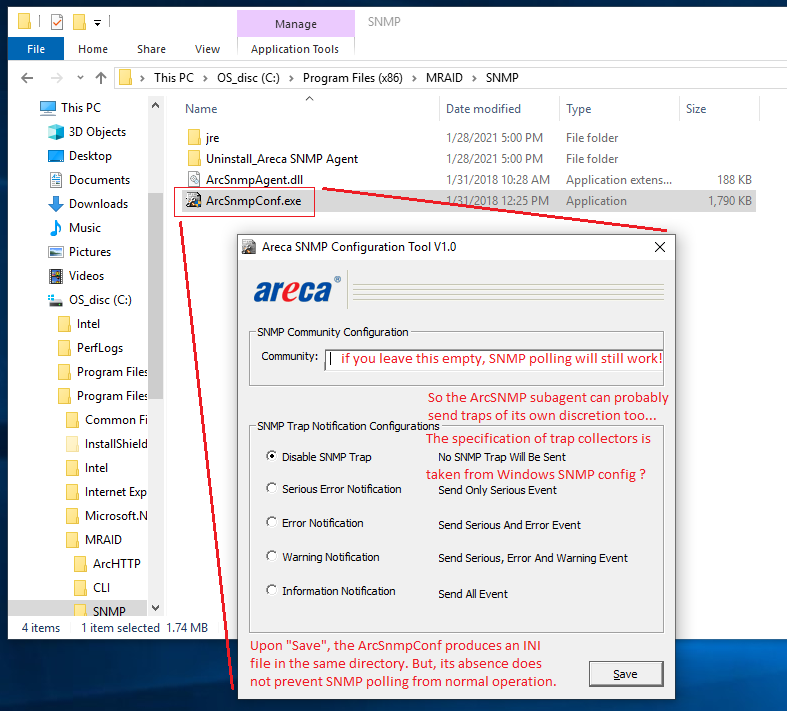
Areca techsupport says, that the community string must be filled in here, in order for ArcSNMP polling access to work. My practical experience is, that it probably does not matter. No harm done if you fill it in. (I believe that the ArcSNMP can send traps on its own, in addition to the separate trap sending capability in ArcHTTP. If you're using traps, feel free to test this.)
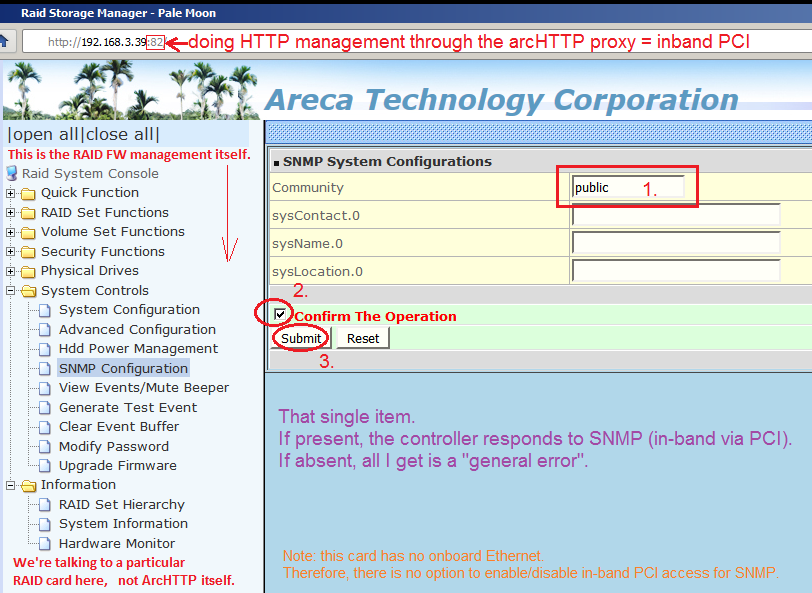
Distraction #3:
First of all, in the following screenshot, please note that
this is the sweet spot where you absolutely
must fill in the Community string. This is the firmware config
of a particular RAID card (a particular firmare instance
within the host PC).
Now: what about those other three attributes? The sysContact,
sysName and sysLocation? Do they matter?

See their effect in this second screenshot:
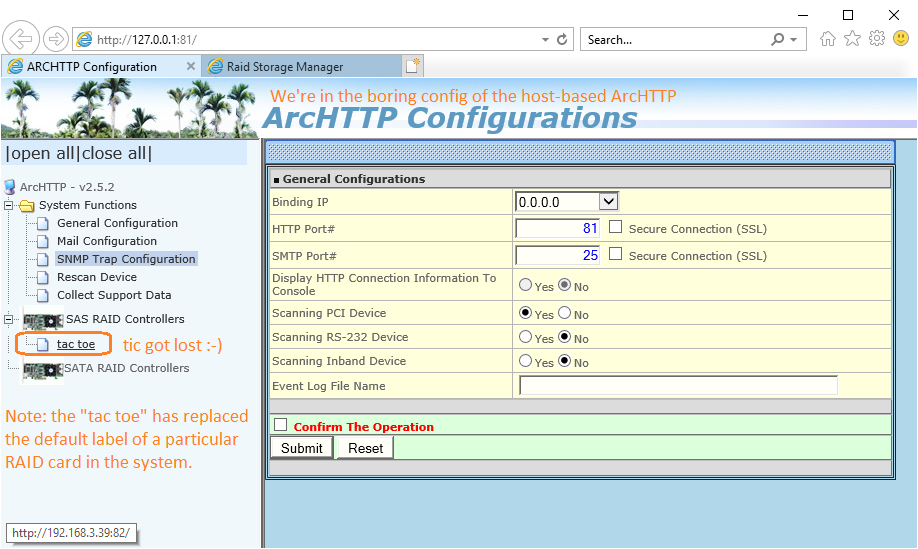
As far as I can tell, this is the only place where "tic tac toe" surface.
I haven't found them in the SNMP MIB tree (polling access).
Maybe they show up in traps? Not sure.
Distraction #4:
Stale firmware versions may perform less than optimal. Namely:
Firmware 1.49 in ARC-1212 can be kind of sluggish in management,
for a few minutes after startup, maybe if the onboard LAN is not connected.
Upgrade to 1.51 improves things a lot.
Also, when using PCI inband management (SNMP) on a machine with multiple cards,
make sure that all the cards with a native LAN port have the in-band PCI
SNMP enabled and the community configured
(however, then they won't respond to SNMP on the LAN port.)
If this is not fulfilled, you can see various weird effects from the inband
management proxy + subagent... apparently such a scenario may be less stable.
Generally with Areca you should prefer a fresh firmware version
where possible.
Distraction #5:
The Windows firewall. Nowadays called the Defender firewall, in Windows 10.
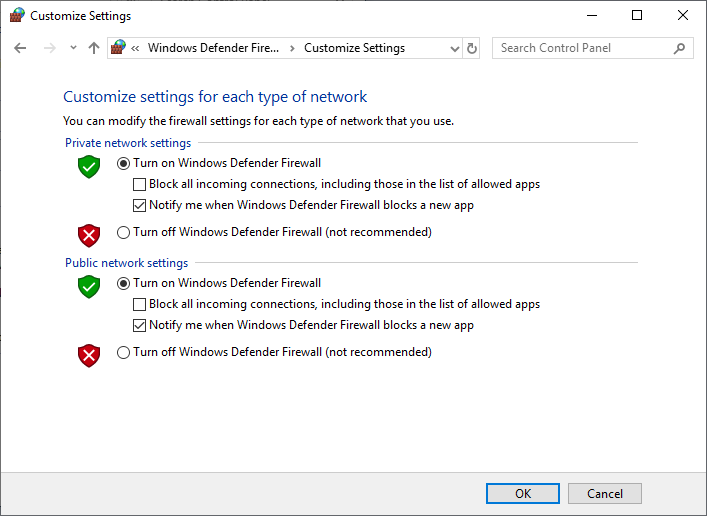
You should not need to disable the firewall.
The Windows SNMP service should create its own rule in the firewall,
allowing outside access to its listening UDP port.
In other words, if you really are struggling, you've configured all about
Windows and Areca SNMP, and still no go, you may try disabling
the firewall too, for a good measure, while trying different things
- but don't really expect a miracle to happen, and turn the firewall
back on immediately after you finally make SNMP work.
Apparently, the firewall still has a legacy Control Panel of its own.
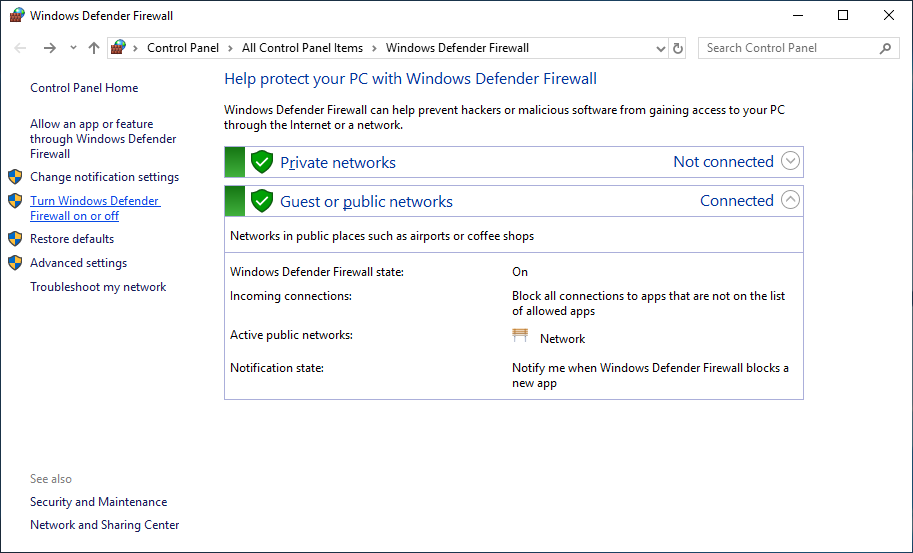
In the menu column on the left, click the label "Turn Windows Defender Firewall on or off" - and this is what you get:
Again don't blame the firewall automatically - in the case of SNMP,
it is likely innocent.
If you're using a different firewall, i.e. something coming with your
alternative AntiVirus software, that may be a different matter.
The SNMP's Management Information Base is really a hierarchical
database with a model that's specified in the ASN.1 language. The MIB files
are text files in ASN.1 symbolic notation, the SNMP protocol transports
requests and responses encoded in a binary format called ASN.1 BER
(for Basic Encoding Rules) encapsulated in UDP over IP.
If needed or just for fun, the textual MIB files can be viewed
and edited by any text editor, preferably capable of UNIX EOL's
- and there are editors that can syntax-highlight ASN.1, such as the
Notepad++
or the VIM.
For every Areca RAID model, you can find a ZIP file containing MIB files,
available for download at the product pages or via the support section.
From a closer look, it turns out that all the MIB files are almost the same,
sharing a large portion of the definitions. Yet Areca put up an individual
MIB file for every model, with minor differences against other models.
More precisely, for PCI/PCI-e RAID controllers that also have an own onboard
LAN port, Areca tends to provide two sets of MIB files:
private.enterprises.areca.1.1 = Areca SATA RAID controller #1
private.enterprises.areca.1.2 = Areca SATA RAID controller #2
private.enterprises.areca.1.3 = Areca SATA RAID controller #3
private.enterprises.areca.1.4 = Areca SATA RAID controller #4
private.enterprises.areca.1.129 = Areca SAS RAID controller #1
private.enterprises.areca.1.130 = Areca SAS RAID controller #2
private.enterprises.areca.1.131 = Areca SAS RAID controller #3
private.enterprises.areca.1.132 = Areca SAS RAID controller #4
While developing this howto, and looking at all the various MIB file
downloads (I gradually collected about 5 different ZIP files),
I felt the urge to have a single MIB subtree in SNMPb,
that would allow me to freely choose any particular controller
ordinal number at a whim. And I didn't like the messy multitude
of MIB files in my archive. Thus, I decided to try and sort them out a little.
To distill the hierarchy and unify the naming conventions a little,
making them more generic. And, while at it, I have also changed
the declaration of siVendor and siModel from SNMP v1 "OCTET STRING"
to SNMP v2 "DisplayString" - for convenience in Wireshark/T-shark,
where the SNMP dissector displays OCTET STRING stubbornly in hexa,
while DisplayString gets displayed as ASCII. Just the declaration
in the MIB file changes the display format, in spite of the (sub)agent
sending the same OID's and the exact same value encoding.
I did not bother to do the same for other string items in the MIB
where this could be convenient too... reviewing all the items
in the MIB would be too much work.
And besides, the OCTET STRINGs all display as ASCII in SNMPb, fortunately.
The result is my own set of Areca MIB files, for your enjoyment.
The ARECA-ROOT-MIB and the ARECA_GRP1-MIB are shared files,
declaring the upper levels of the hierarchy.
(Looking back I could've spared myself the dedicated "group 1"
file, but ahh well. I also tried "group 0", but it turned out
to be moot / useless, so I didn't package that into the zip.)
So you need those two files too, as they are referenced by the
eight larger "ordinal numbered" MIB files.
In the end, it turns out that the 8 "ordinal numbered" MIB files
declare a number of overlapping item names, starting from siVendor
and siModel. It would be nice to have these globally unique
(as seems to be a good standard practice in ASN.1 / SNMP)
but would complicate things - and as long as both SNMPb
and Wireshark can cope with the overlaps gracefully,
I'd just go with that...
I understand that this "data modeling ambivalence" is a property of the
SNMP (or ASN.1 ?) metamodel, where there's only a single level of
integer-indexed "object instance", being given strictly as the very last
element in the OID "dotted path". Thus, there's probably no way
to somehow intelligently index say "disk drive #4 in enclosure #3
on controller #1 within this SNMP agent instance".
By now I've probably glimpsed the pain, shared by people maintaining
SNMP MIB's for various sorts of networked hardware. And I understand
one particular aspect of motivation for alternative "means of data
retrieval" for network element management / supervision / data collection.
Examples of such alternative means are IMO the Cisco "telemetry"
or e.g. a REST-based API just being rolled out by Meinberg...
SNMPb
in Windows keeps its MIB files in the program directory,
in a subdir called C:\Program Files (x86)\SnmpB\mibs\ .
Interestingly, there appears to be a convention that the MIB files do not have
a dotted suffix, but instead end with -MIB ("dash MIB"). I often rename
MIB files to match this convention, to make snmpb and other software happy.
Note that the "MIB module name" is not taken from the filename - rather,
the SNMP MIB module name is specified inside the MIB file.
So you copy your custom MIB files to the aforementioned directory.
SNMPb only ever scans for MIB files on startup = you may need to
re-start SNMPb if it was running while you were adding MIB files
on disk.
In the following screenshot, the available MIB files are listed
on the left and you can move them to the right pane, to get them
loaded for use in the SNMPb MIB tree (main screen).

Once you get all the desired SNMP modules loaded, feel free to switch to the pane or tab called "Tree" = the main screen of SNMPb.
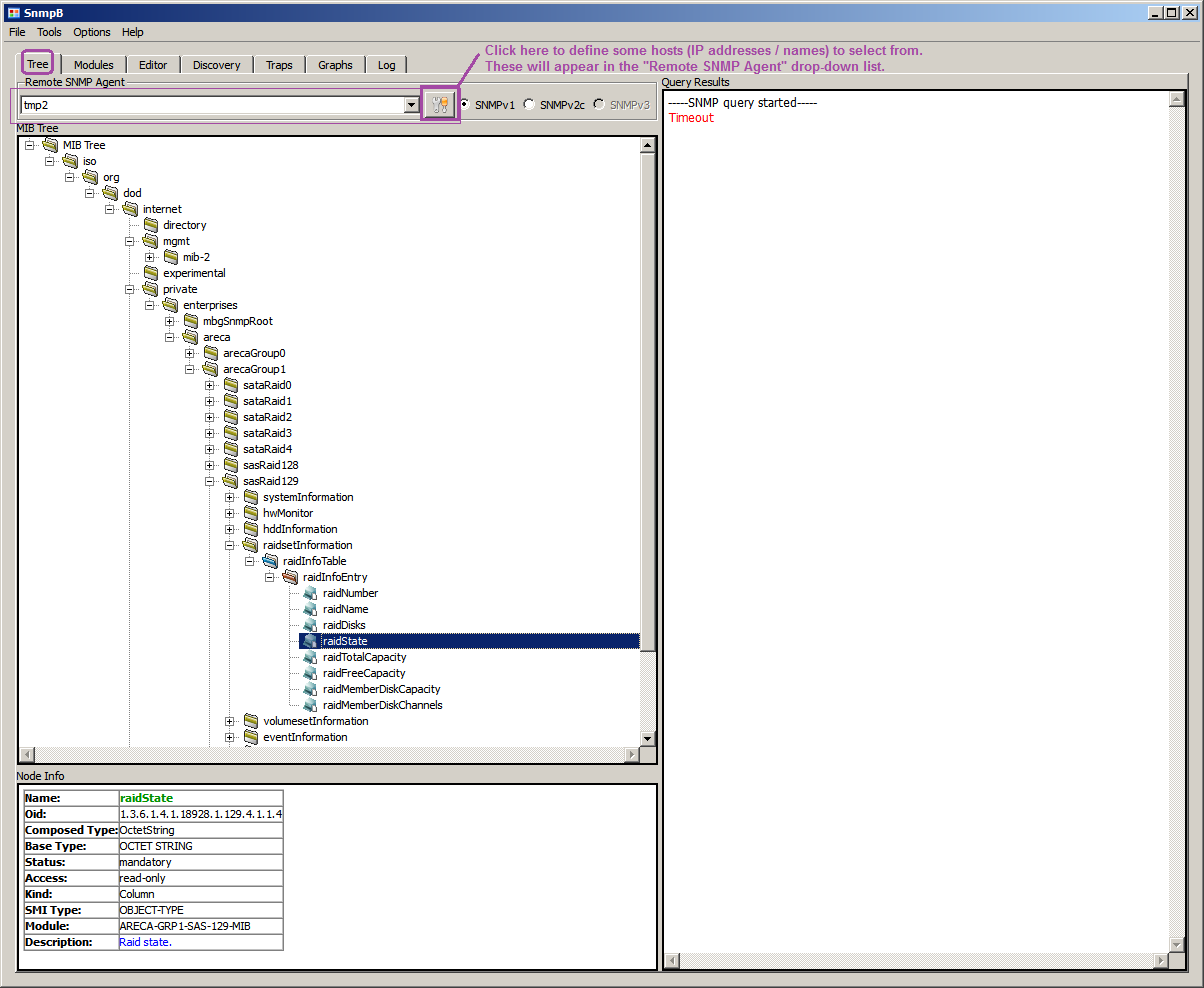
Vendor-specific custom MIB subtrees tend to appear under iso.org.dod.internet.private.enterprises .
Wireshark
in Windows keeps its MIB files in the program directory,
in a subdir called C:\Program Files\Wireshark\snmp\mibs\ .
Reportedly the inner MIB module name must match the file name exactly, for Wireshark to work with them... not sure I have observed that.
To select the MIB modules to load, go to Edit -> Preferences -> Name resolution.
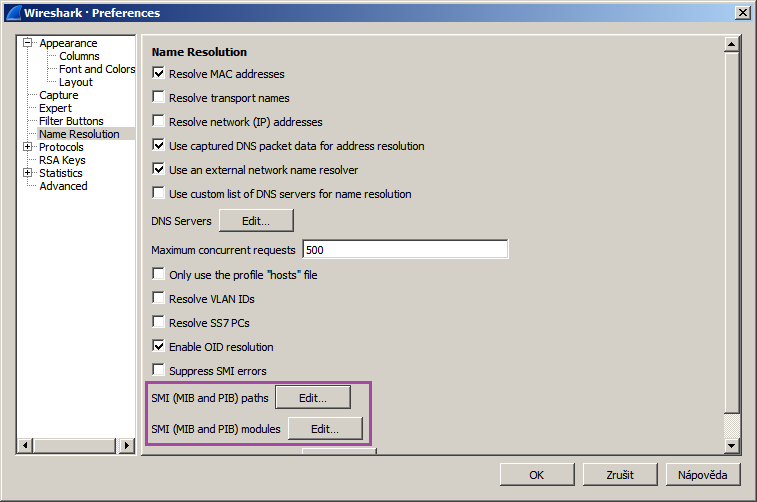
Mind the two buttons labeled:
SMI (MIB and PIB) paths
SMI (MIB and PIB) modules
The set of MIB modules to load is actually stored in a plain text file called
C:\Users\[my_user]\AppData\Roaming\Wireshark\smi_modules
And, you can actually edit that file while Wireshark is turned off,
and add your favourite list of modules by hand, one module per line,
in quotes. I'm attaching my own version of the file, for your inspiration.
Wireshark should then dissect SNMP including textual variable names and contents. (The wireshark app may need a restart after this.)
Scribbled by: Frank Rysanek [rysanek AT fccps DOT cz]
Last update: March 2021